
Cryptomining 200 - How I Started in 15 Minutes
How my crypto journey got started. With a lot of pics.
TL;DR: I got started Cryptomining in 15 minutes. Plus pics.
Coming off the Cryptomining 100 publication where I explain the blockchain network value of cryptomining and what I learned, I’ve done a walkthrough from start to finish of how I got started.
This post is filled with a lot of photos and graphics. As a result, your email app will clip it. Somewhere in the middle your email app will “clip” (shorten) the post - click “View Entire Message” at the bottom, or click this to view in a web browser.
Sections you can skim to:
WHAT Caused Me to Start?
WHY Try Now?
HOW Did This Work for Me?
IS There Coding?
DOES It Work?
WHAT’s Next?

TL;DR: I justified an expensive purchase that was making my other expensive purchases redundant and got into Cryptomining.
When I walked into the electronics store and bought an RTX 3080 TI, I basically walked out with one problem: What do I with the graphics cards I have sitting in my home that this will replace?
The RTX 3080 TI would be coming home to an existing computer setup that already had an RTX 3070 in use for gaming, and an old GTX 1080 from 2016 lying around. With the RTX 3080 TI, my two existing graphics card would be sitting around collecting dust.
I had previously heard of cryptomining from coworkers including an EY Partner (I know right) and another EY coworker. The notion that you can take dust-collecting hardware and have it earn passive income, and during the 2021 crypto rise, a lot of income. It sounds great at face value, but my top concerns were my barriers:
My Concerns:
How difficult is it to learn? Crypto is mind boggling.How much time is it going to take to start and maintain?
TL;DR: Cryptomining requirements used to be high and numerous, and I thought it to be expensive. That’s no longer the case.
When cryptomining first began, it was difficult to enter. A lot of tools and online cloud services you needed simply did not exist, and not enough technical literature existed either. As far as I could tell, there were 6 barriers as articulated in my powerpoint diagram below.
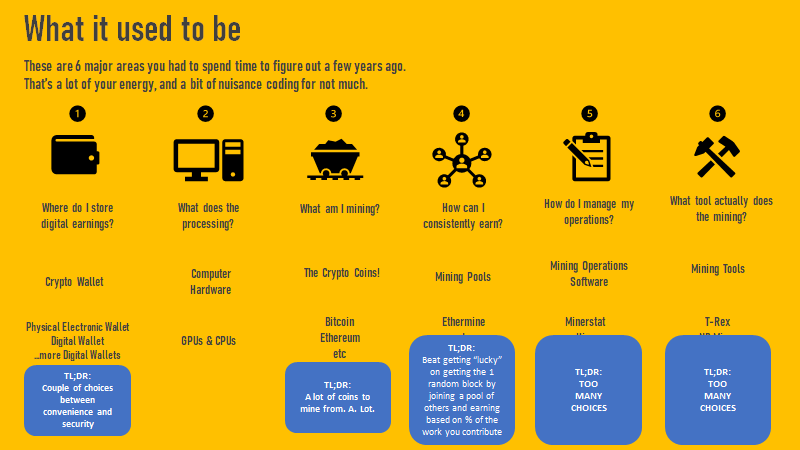
There were many ways to get started, but where do you begin if you don’t trust, or know, any of it? There’s a lot of noise.
At least, that’s what it was then.
As of 2022, this is no longer the case.
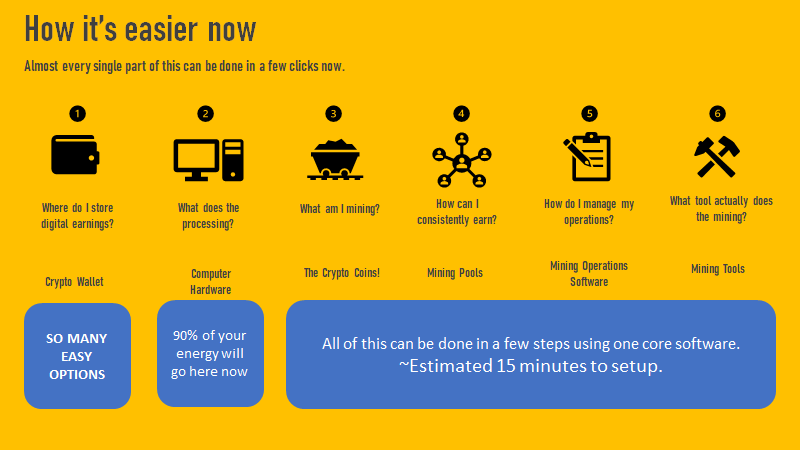
While hardware is still a challenge, it is the only remaining challenge. Everything else has been simplified. While I can’t help you choose the perfect cryptocoin to mine, I can advise this: You can figure out the coin on the go.
Metamask and Coinbase make it easy to get an online crypto wallet. And guess what? My research landed me on a software service called Minerstat which handles all the heavy lifting. I chose Minerstat because of the following:
Wide selection of cryptocurrencies
It decides the best mining tool for the coins I am interested in
It handles expansion of operations really well
I can start in 15 minutes.
Minerstat tutorials are short and simple, and their troubleshooting documentation is stellar. This sounds like a sponsored post - it’s not - I just advocate delightful user experiences.

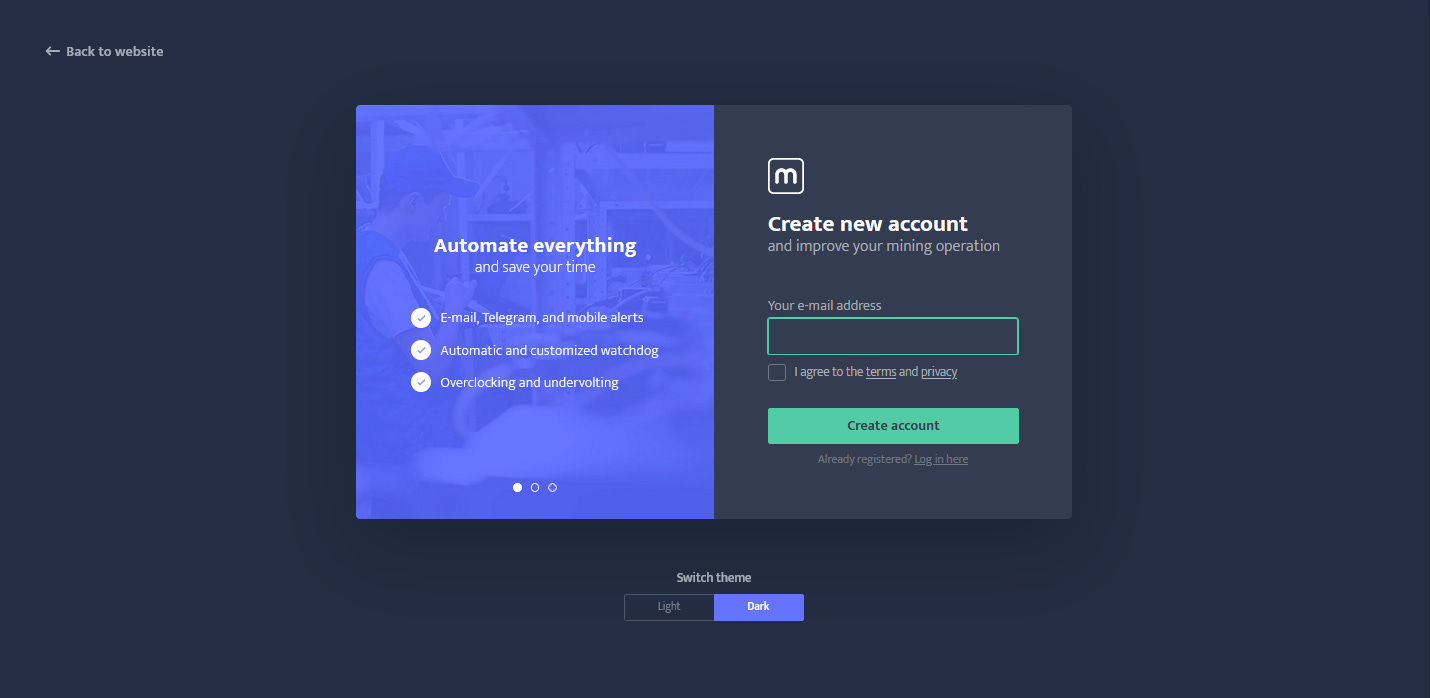
TL;DR: Screenshot Walkthrough of the Minerstat Starting Experience and a Dogecoin purchase.
I created my account on Minerstat and got started. The software has a simple user experience and onboarding process that it’s worth starting your cryptomining journey from.
I went through the configuration tool they have, selecting the hardware I had on machine for mining. There’s a discovery tool there to make it easy for you to identify the technical hardware you have, in case you don’t know.
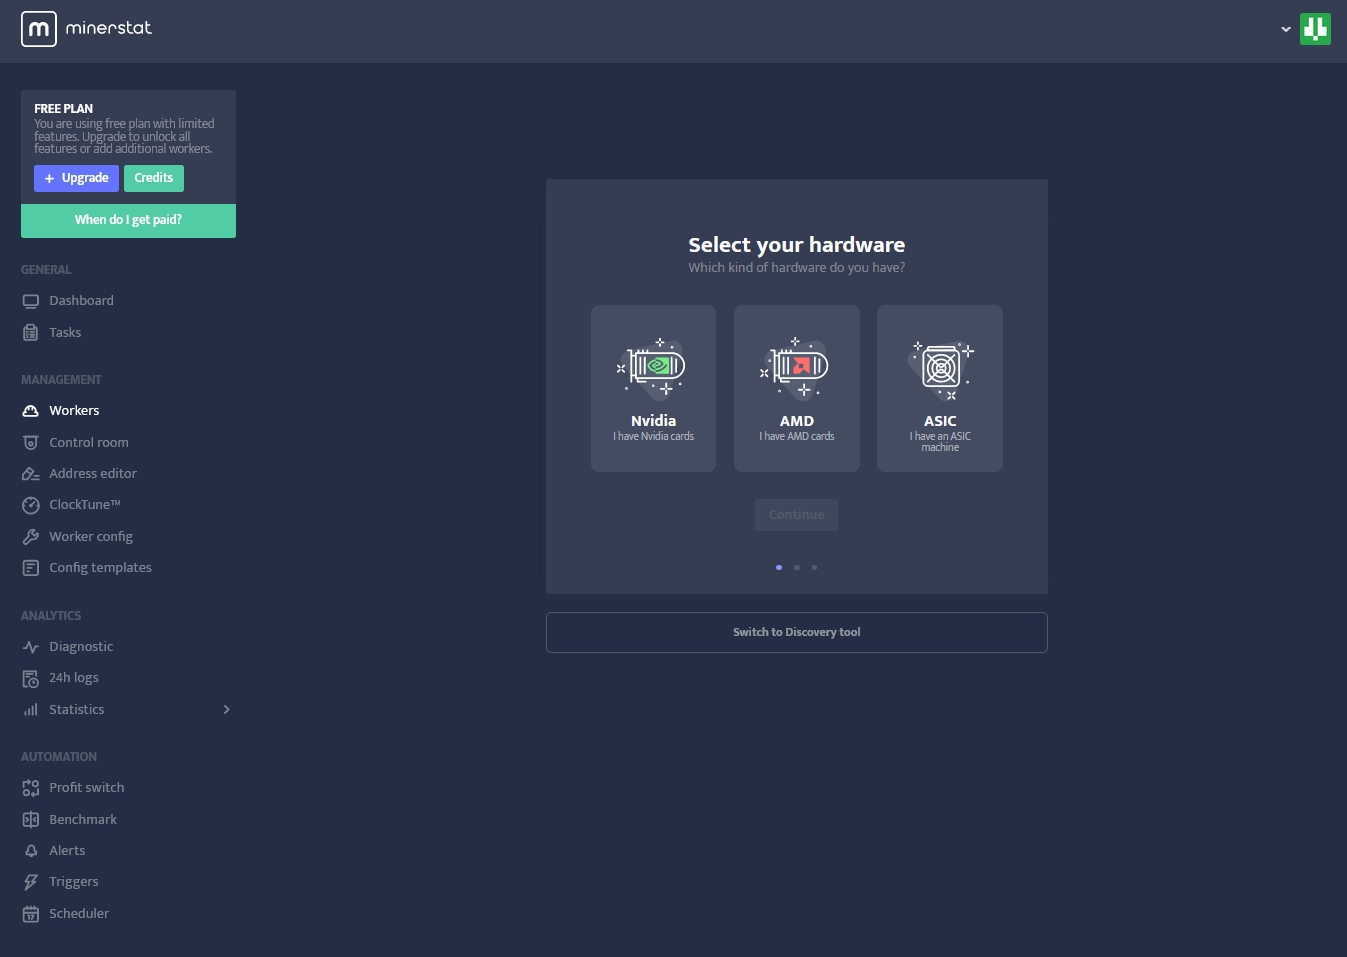
I named the worker! Make sure to give it as simple of a name as you can remember. You’ll need to use it as a login credential later on, and also once a month. Also, do not fret on who knows your worker name. Intruders need access to both your 2FA key, and IP Authorization via Email, to get access to the worker.
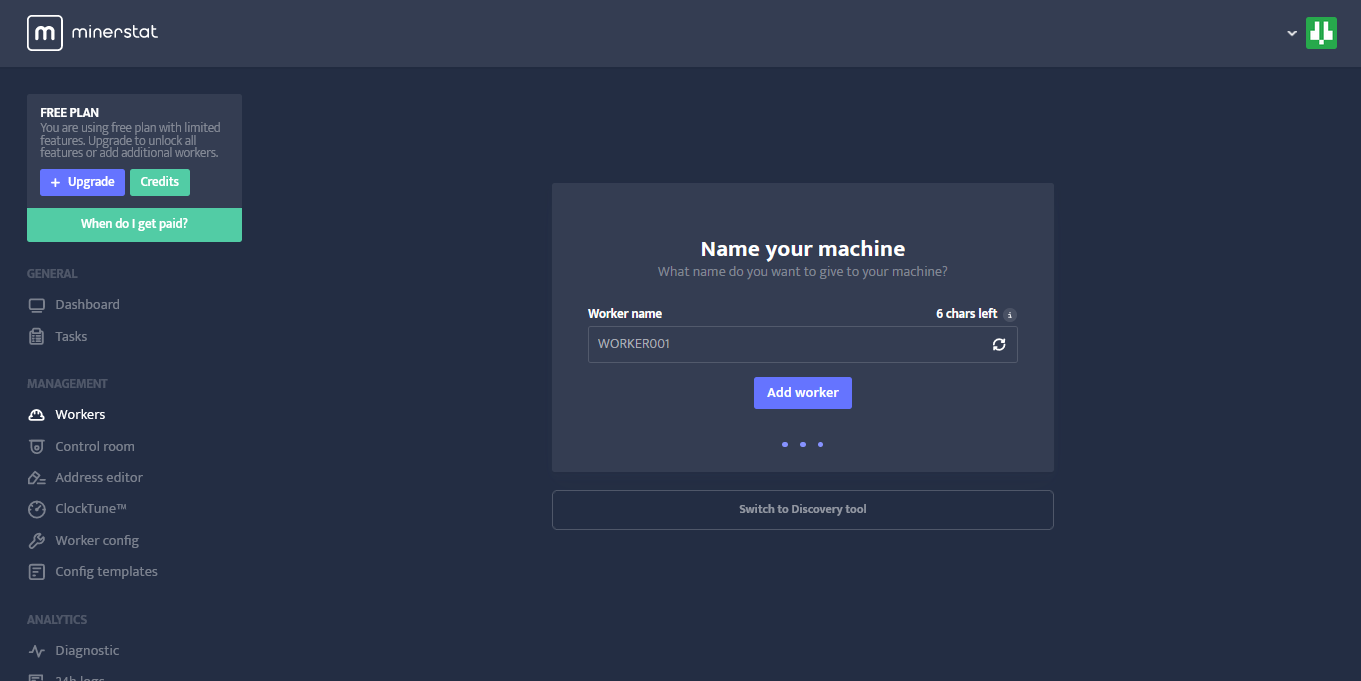
What’s a worker?
A worker in minerstat is the computer you are mining from. If you have 3 Graphics Cards in one computer, that’s one worker. If you have 3 graphics cards in three computers, that’s 3 workers. Minerstat is free for one worker.
I have two workers now, and I paid Dogecoin to be able to have a 2nd worker in Minerstat, though you can pay with other cryptocurrency and regular money. Don’t believe me on Dogecoin? Here’s what I paid to get a 2nd worker license.

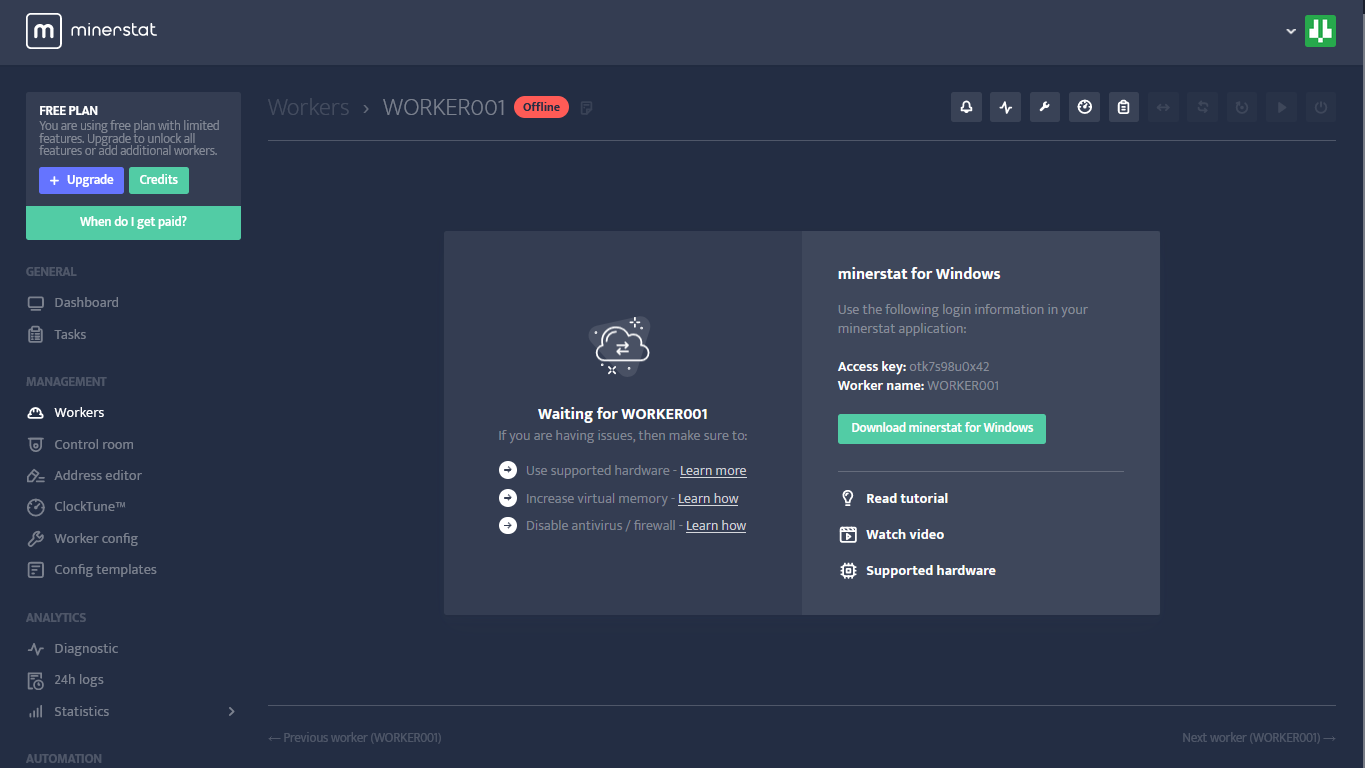
Download the Software to Your Mining Computer
The software you are downloading is the actual mining operations tool for your computer. It automates the starting of the mining operation, loading of mining profiles and tools, and shutdown if necessary. You will not be controlling the operations from this. It’s simply setting up a connection between your computer and your cloud account which contains all the directions you want your mining operations to go in. Below is an example, which includes an access key. Given that this is pulled for screenshot purposes, this one is basically a dud.

TL;DR: Is there any coding involved? No. Lots of copy and pasting though similiar to routing and account numbers for banks. Also you get to see one of my wallet addresses.
Remember when I said I was worried about how much time it would take to setup? I’m actually worried about the coding part. I don’t want to do that. Turns out, there isn’t much to do except copy and paste a lot.
In Minerstat, there are two sets of configurations you’ll need to get and double check.
Crypto Wallet Address
Mining Pool Address
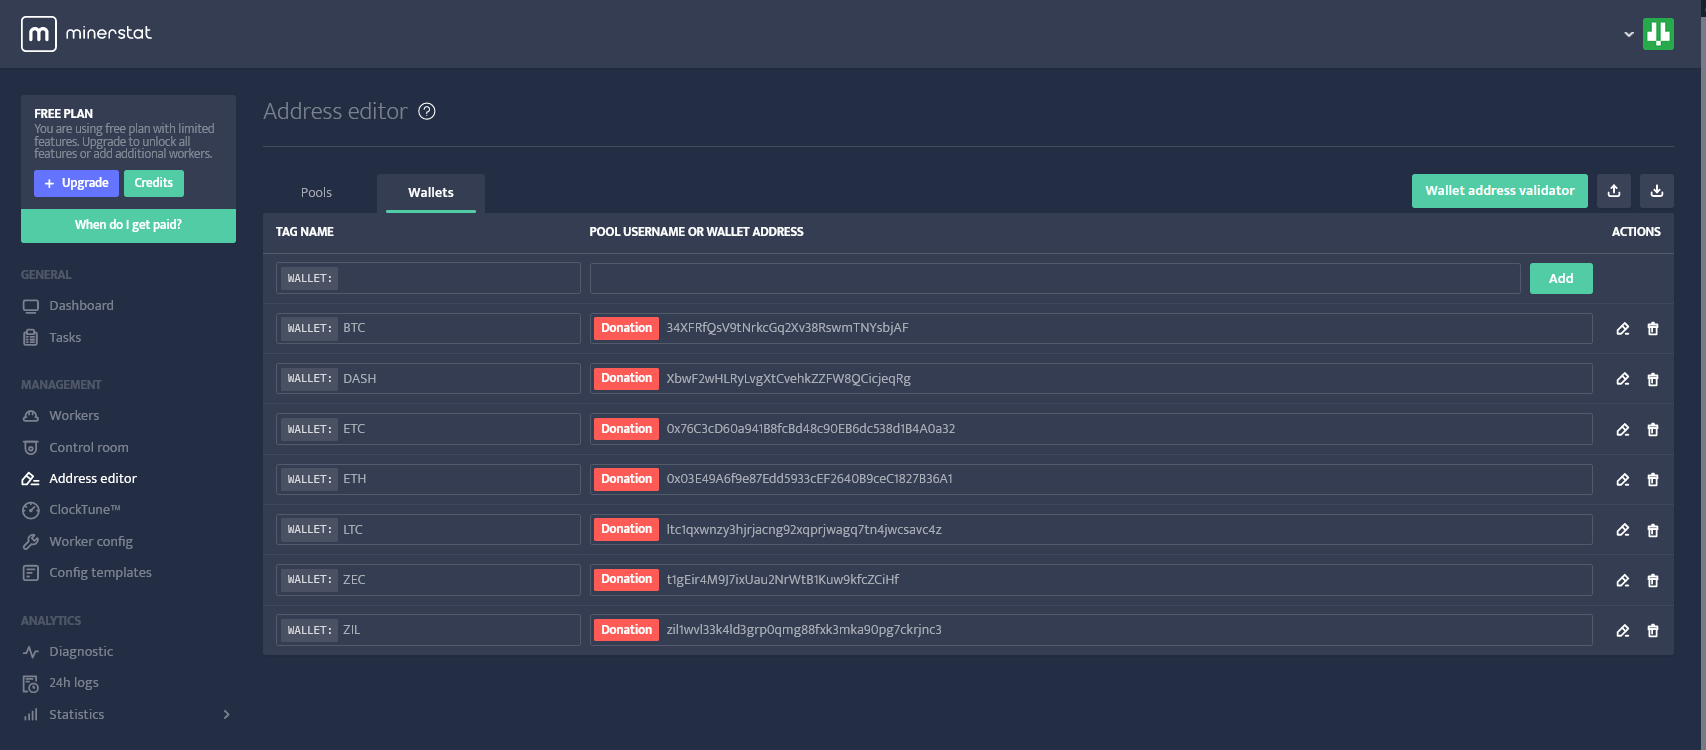
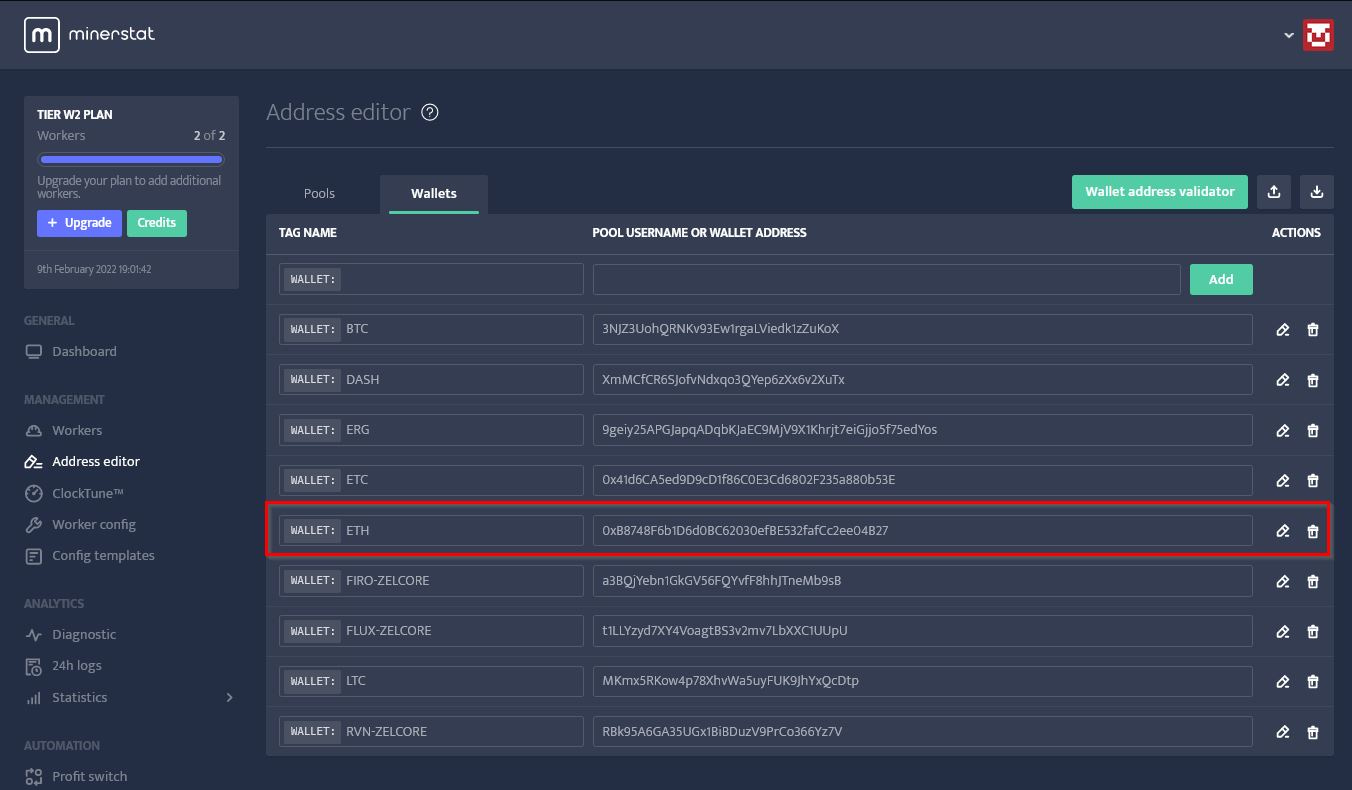
Crypto Wallet Addresses
By default, Minerstat provides “donor” addresses. You need to replace those addresses.
I put in the wallet addresses in Minerstat for each respective crypto I’m interested in. I had a Coinbase account (and if you don’t, you can use this referral link to get one too), and I followed their guide to get a Coinbase Wallet account too. Below is my screenshot journey of getting Minerstat updated with my wallet stuff.
Spoiler alert: You’ll get to see my crypto mining address.
Getting Your Addresses for Mining Purposes
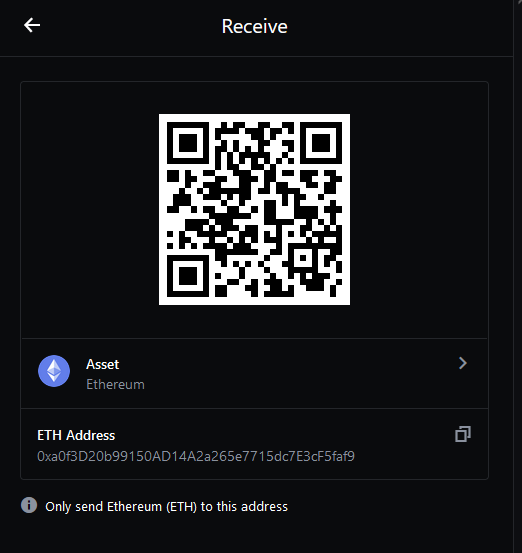
If you’ve never used Coinbase before, you can click “Send / Receive” on their main dashboard, or in the mobile app, and then click the crypto asset you are interested in receiving (Ethereum in this case). You see that ETH Address that looks like technical non-human jargon? That’s your address.
Coinbase & Unlimited Wallet Addresses
You can use Coinbase to create an unlimited amount of addresses. Each address you create is permanent to you, and you can create as many as you want for the same coin, or many coins. In fact, every time you use Coinbase and use their “Receive” feature, it will automatically create a new address for you every single time. Coinbase asserts that this is done for transactional privacy reasons to prevent 3rd-party transaction viewers from looking at any transactions that are historically associated to your account (ahem whale wallet watching ahem).
For mining, you’ll need a permanent address, so go with the first address you can get for ETH on Coinbase and insert into your crypto operations. Here’s how:
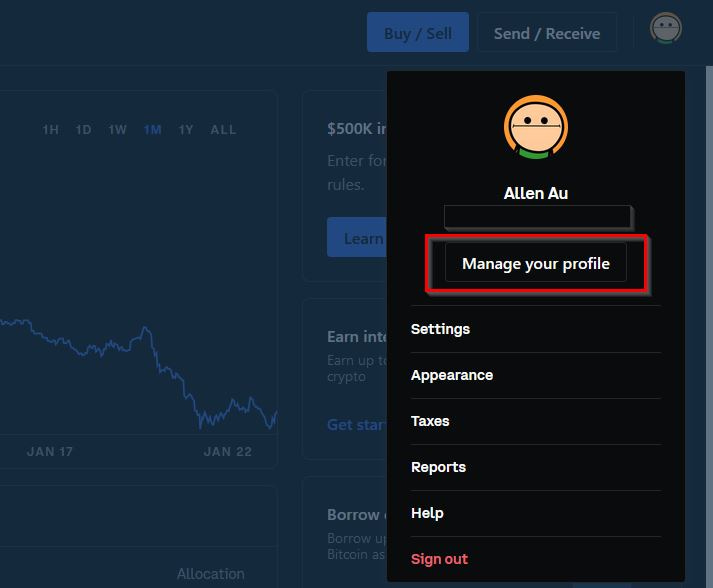
Click your profile photo.
Click Crypto Addresses
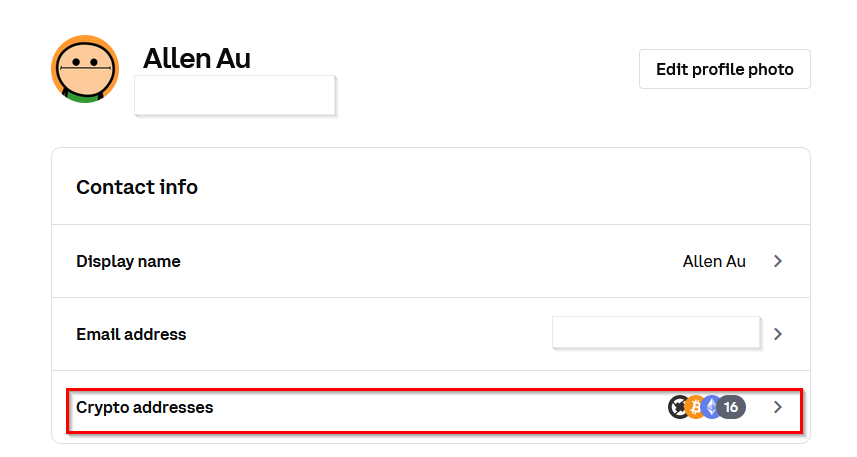
Find your addresses here. I’ve labeled the one I’m using as mining so I don’t forget.
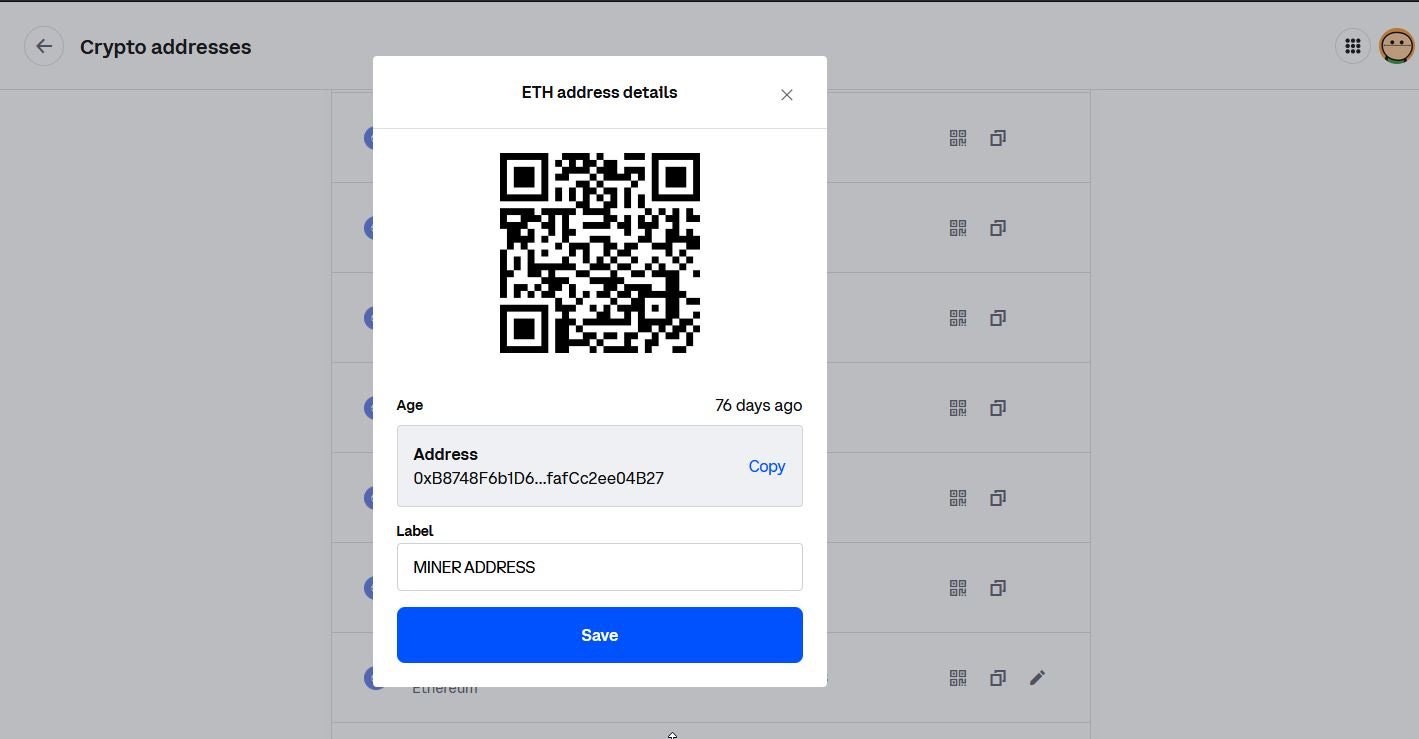
Here’s my wallet address so you can see what’s going on.
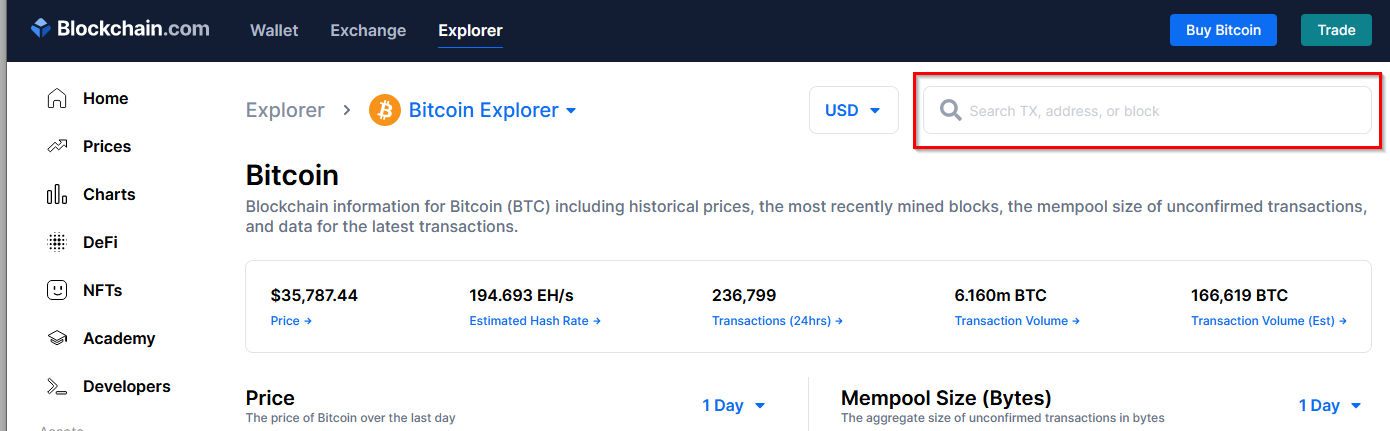
My address: 0xB8748F6b1D6d0BC62030efBE532fafCc2ee04B27To get the first glimpse as to why people are crazy about blockchain technology, use this tool from Blockchain.com called Blockchain Explorer. Enter my wallet address above.
Wait, what, did you just share your address?
If you’re new to crypto and blockchain, welcome! That’s the beauty of Blockchain technologies. Knowing my “public address” as you see above is intentional within the blockchain ecosystem, and it’s not enough to put me at risk. The public address is the equivalent of a “Read-only” address, or a “one-way directional payment” (aka things can only go TO the address, not FROM).
Insert the Crypto Wallet Address into Minerstat
Make sure to double, triple, and quadruple check your addresses. It would be unfortunate to you if you did all this work, only to not get the earnings.

Congratulations! You’re ready to receive earnings. But where do you get it from?
EMAIL MESSAGES WILL CLIP AROUND HERE. OPEN IN BROWSER TO CONTINUE
Mining Pool Addresses
So where do you actually mine from?
Pool Address represents where you are mining from/with. You can insert the internet address of a mining pool of your choice, or independently mine.
What are my choices?
I looked into solo-mining and mining with pool. For Ethereum, I read that it’s basically pointless unless you have 20 GPUs (or $10,000 worth of computing!) to attempt to solo mine, and even then, it’s about luck. So I joined a mining pool where I can contribute my computing power in exchange for predictable and proportional rewards hourly.
What did I need to know before getting started with a mining pool?
Fees and rewards. Whose got the low enough fees, and if I’m interested, who has a decent rewards? There are mining pools out there that offer two coins (ETH and ZIL for example) as well as mining pools that pay you in BTC. The choice is yours. I chose Ethermine.
Ethermine, the Mining Pool
I chose Ethermine arbitrarily so I can’t give you a great reason.
To get the address that I am “mining from” that I would need to put in Minerstat, I went to Ethermine’s getting started page which displays addresses and configurations you need.
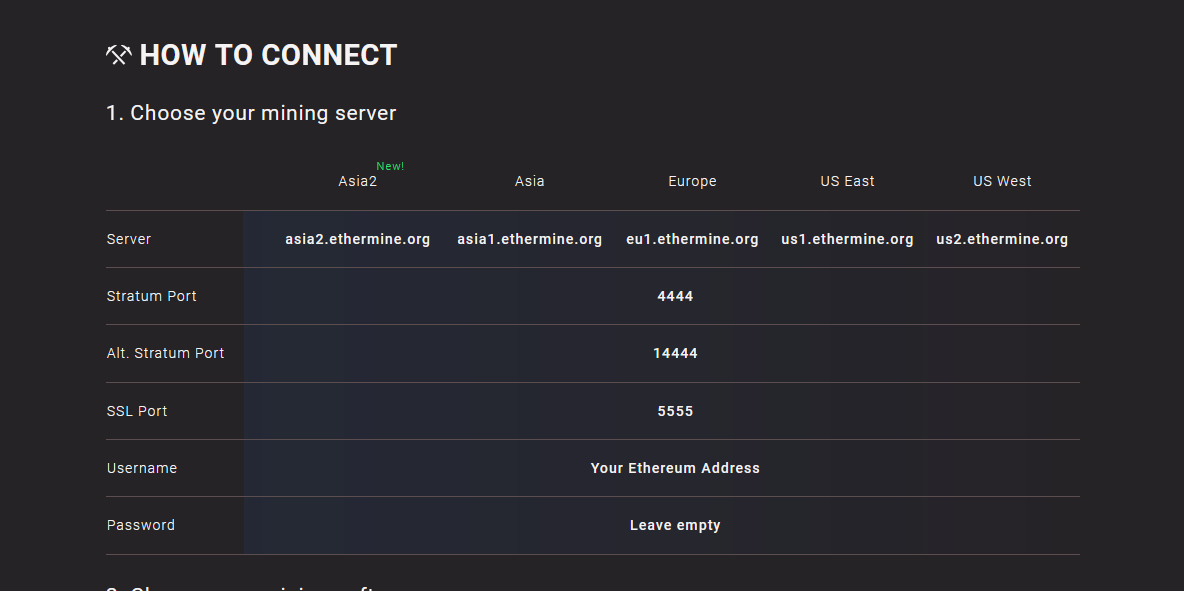
Remember, the pool address represents the source of where you are mining from/with. It is important, absurdly important, you choose a mining pool that has geographic server addresses in your area. If you live on the West Coast, and you are mining from Europe, you’ll experience internet delay, so much so that it can impact your performance causing failed mining attempts and rejected shares. So configure diligently.
I messed up and was mining from Europe for the first 5 days. Oops. I have since corrected it.

TL;DR: It works. Pics for proof.
Once I had my wallet address in, and the mining pool set to mine Ethereum, I downloaded and started the Minerstat for Windows software. The first guinea pig was my main computer I used for everything. It’s small and can only support one graphics card.
Logging In
Everything that happens after you login is automated and will execute based on what you have configured in Minerstat. I set the coin and addresses, and the rest if managed by the program.
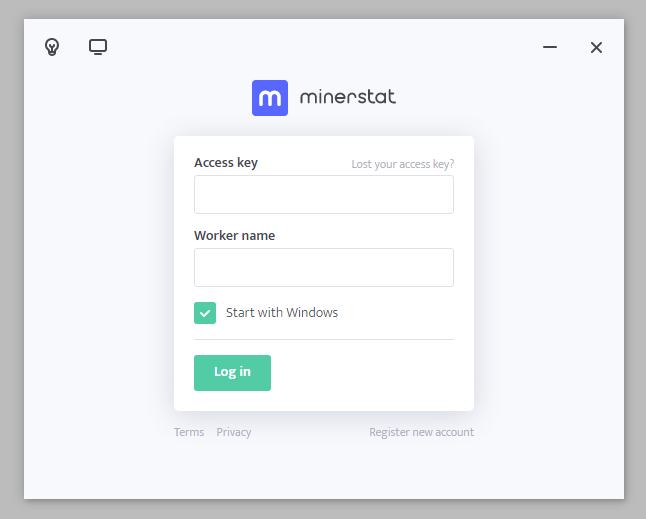
You’ll see the window start to commence. Never share this part publicly as it contains your login information, token, and IP address.
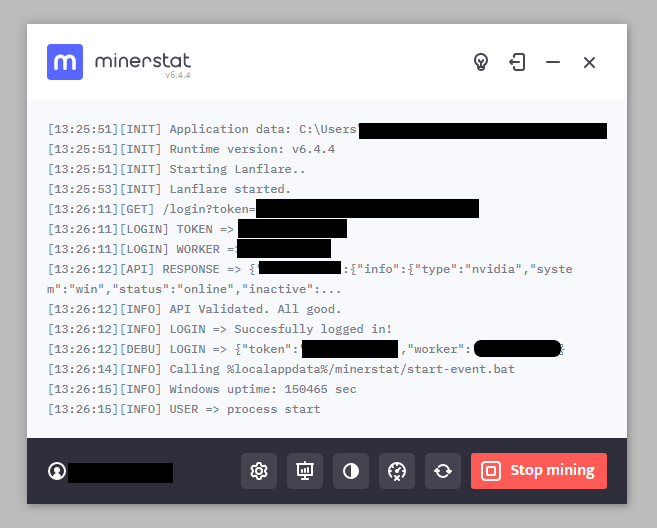
The wizard will also do a hardware and configuration check. It will identify all available graphics cards that are being used automatically, even when you swap your graphics card in and out or expand your mining rig.
It will also do a virtual memory check and offer a recommended virtual memory size you should configure to.
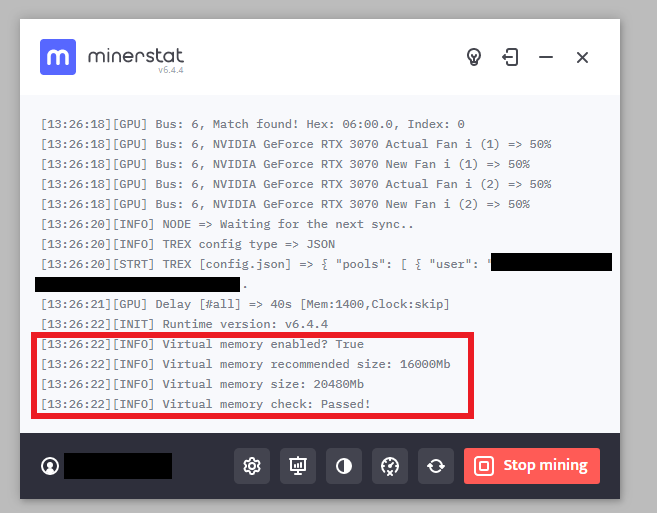
If everything passes, Minerstat will launch the actual miner which is a terminal or command prompt window. That’s normal and can run in the background as you do office work.
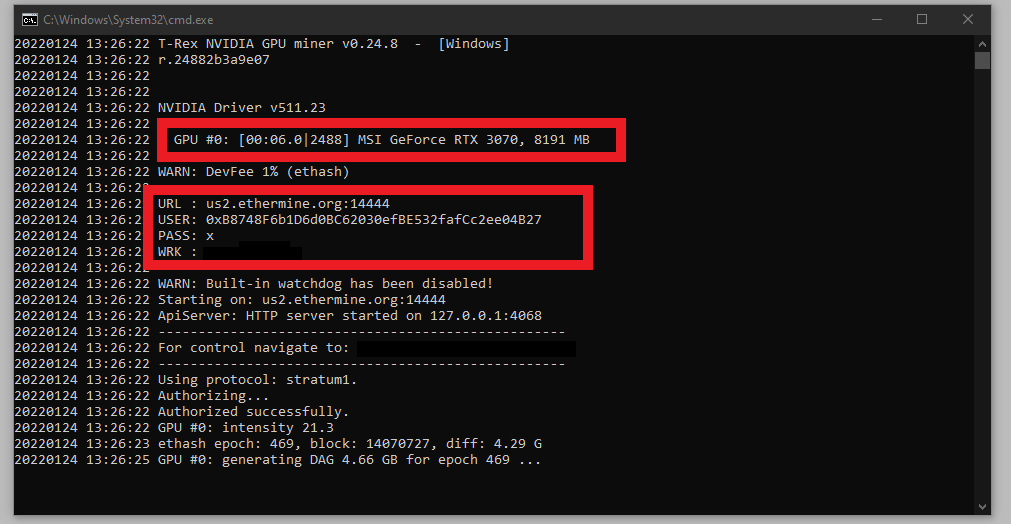
Above in the command prompt you can see that Minerstat has launched “T-REX v0.24.8”, a mining tool for my graphics card to mine ETH. It is one of many tools available. You can choose your preferred mining tool in Minerstat later on based on which developers of each tool is better.
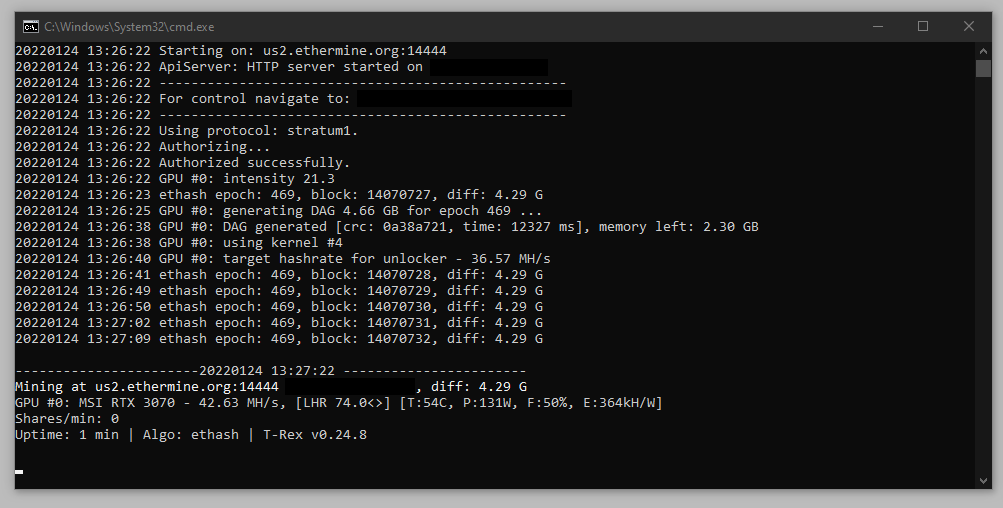
On the second screenshot you’ll see this line:
GPU #0 MSI RTX 3070 - 42.63 MH/s [LHR 74<>] [T:54C, P:131W F:50% E:364kH/W]This line basically reads:
Performance: My RTX 3070 is mining at 42.63 MH/s. That is $1 per day (given our Crypto market in 1/24/2022) but using a USD daily earnings is misleading. 42.63 MH/s translates to 2% of an ETH coin per month. The ETH it is mining is consistent regardless of the USD value.
According to WhatToMine.com, I’m close. This number represents your calculation speed, and you should keep a close eye on whether your graphics card is mining close to what everyone else is reporting. WhatToMine is one such site to cross-reference the speed, MiningChamber is another.Temperature: T:54C - Temperature is at 54C, or 129.2F. 12 hours of running later, and it’s at 56C, or 132.8F. If your graphic card runs too hot, it will throttle and the performance will be dialed down.
Power and Fan: P: 131w - I’m using 131w of power per hour. Multiply this by 24 hours and it’s 3.14 Kilowatts. My utility charges 19 cents per Kilowatt, so this amounts to ~60 cents per day in electricity. The fan is at 50% as denoted by F: 50%, meaning I’m running the cooling at 50%. I chose that since it’s quiet, but still effective.
After this run through, my passive mining operation was online.
The Mining Operation Dashboard
Now looking at command prompts to monitor performance is a bit of a drab. Minerstat has a dashboard for all of this, complete with a lot of real time and historic metrics.

There’s also a phone app!
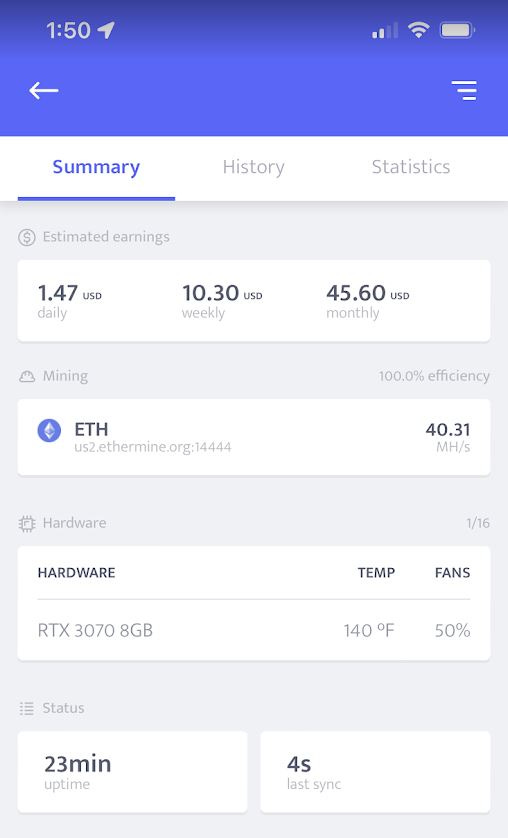
This dashboard can also allow you to control performance of the mining setup including computing speed and fan speed. More importantly, if you need to shutdown the software, restart the computer, or restart the software, you can also do that through both the mobile and web apps.
Some good practices to have:
In the beginning, I corroborate that I am actively mining, and mining at my reported speed, by cross-checking what’s in Minerstat with what is in Ethermine. When I cash out, I also corroborate activity with my wallet.
That’s it. That’s the only good practice to have.

TL;DR: It took 15 minutes to start, 2 days to master, and no time to maintain. I leave my mining rig passively running in the garage.
Was it difficult to learn? Shocklingly no. Easy to start, but a bit time consuming to master. However the knowledge you gain as a result of the necessity has high utility, plus exposure to Crypto.
How much time did it take to start and maintain? 15 Minutes to start, 2 days to master, and about 10 seconds to maintain. I try to forget my mining operation and treat it as passive crypto ops.
I’ve had this notion that getting into Cryptomining was difficult, with many mechanics to master, and a lot of code to understand. That’s not true, and much of the ecosystem has been made easier. And that’s how this all started.
Hope you enjoyed this Cryptomining 200 publication of the Cryptomining series. Read Cryptomining 100 if you want to see the theory. If I were to write a Cryptomining 300, it would most likely be on the risks and response strategies to have, or the hardware. But that’s for a much later time.
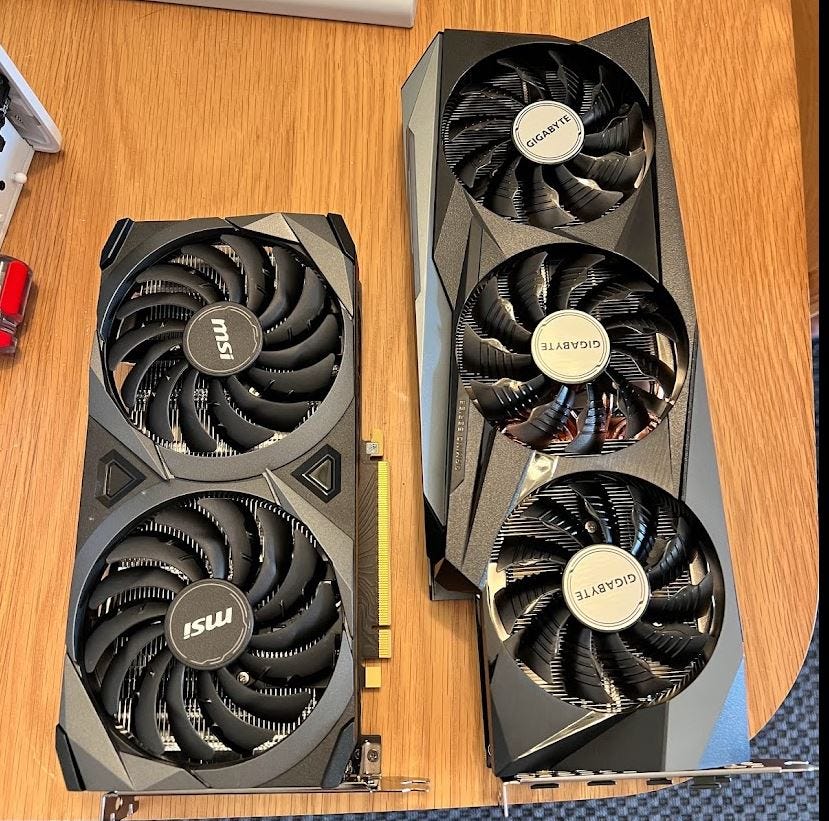
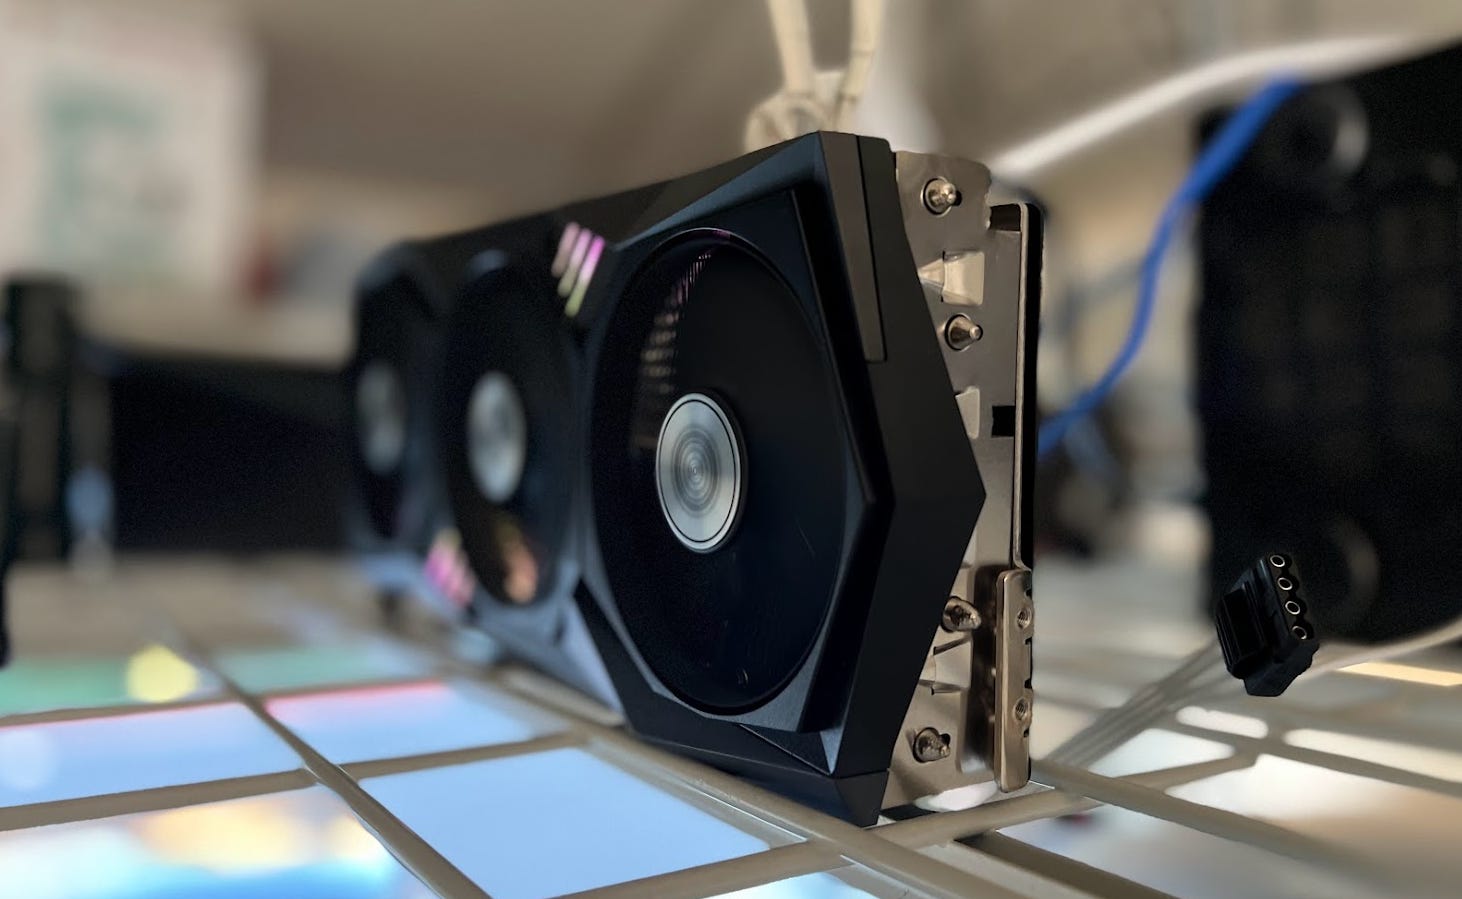
Here’s some extra pictures of my things.

Spare Parts PC
My RTX 3080 TI went to my daily driver, but my RTX 3070 and GTX 1080, which were made obsolete by newest purchase, were placed in a spare PC and converted into a mining rig in the first week. In this setup, there was an extreme amount of heat for the top graphics card. I would later solve this by removing them from the computer case all together.
What it is now:
I have four graphics cards now. RTX 3080 TI, 2 RTX 3070 TIs, and a RTX 3070.
Each one of these is rather huge.
My main mining rig is a 3 Graphics Card machine that physically can’t fit inside the case. Nor would I want it to be in the case as the heat inside can get intense. I ran extension cables to get this to work.
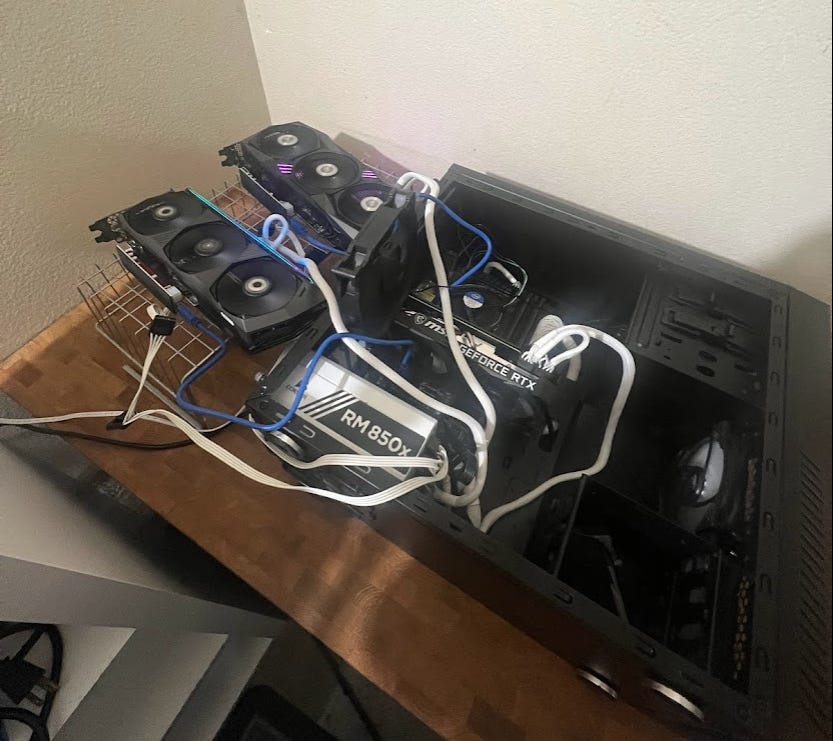
My main mining rig is currently in my garage, mining.

Super helpful, thank you! Found you through the LearningBrew community. I had been itching to mine but was daunted by the coding. This helps.